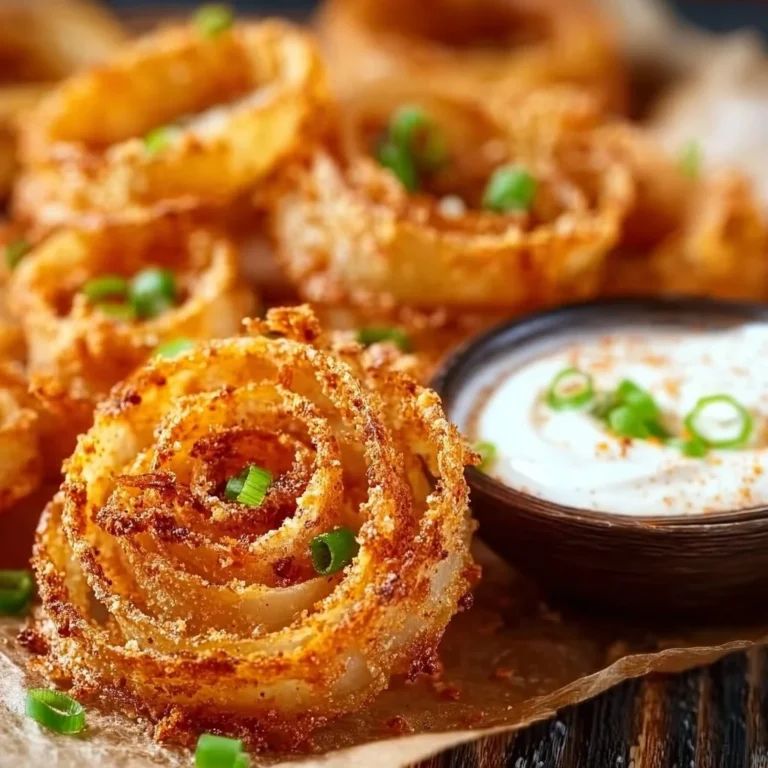
Bite-Sized Blooming Onions
I still remember the first evening I tried to recreate a restaurant-style blooming onion at home: the kitchen smelled like sweet onions and frying oil, my hands were dusted with flour, and I felt a little nervous about getting that crisp, golden edge just right. Many of us worry about timing, texture, or whether a gluten-free version can really be as tender and crunchy as the original. I want you to know this recipe is forgiving, simple, and cozy — the sort of thing you can make on a relaxed weekend, with a cup of tea nearby and no stress about perfection.
A Quick Look at This Bite-Sized Blooming Onions Recipe
These Bite-Sized Blooming Onions turn two sweet onions and a few pantry staples — buttermilk and a seasoned gluten-free flour — into crisp, golden morsels that are perfect for sharing. The benefit is in the texture: like tiny onion petals with a reliable crunch and a soft, sweet inside. It’s a straightforward, family-friendly recipe that works well for everyday gluten-free cooking because the techniques are simple and forgiving. If you love a crunchy snack with a tangy dipping sauce, these will feel like a warm kitchen hug — keep reading to learn the easy tricks that make them shine.
Ingredients You’ll Need for Bite-Sized Blooming Onions
Essentials
Trusted gluten-free essentials
- 2 large sweet onions — look for firm, shiny bulbs (Vidalia or Walla Walla if available). These give a mild sweetness that balances the crunch.
- 1 cup gluten-free all-purpose flour blend — choose a blend formulated for frying and baking (one with rice flour, tapioca, and potato starch tends to work well).
- 1 teaspoon paprika — for warmth and color.
- 1/2 teaspoon garlic powder — gentle savory note.
- 1/2 teaspoon onion powder — boosts onion flavor.
- 1/2 teaspoon cayenne pepper — adds a friendly, adjustable heat (use less if you prefer mild).
- 1/2 teaspoon fine salt — for seasoning the dredge.
- 1 cup buttermilk — full-fat is cozy and helps the coating stick; dairy-free cultured buttermilk works fine too.
- 2 cups gluten-free panko breadcrumbs — look for a rice- or corn-based panko-style crumb for that flaky crunch.
- Vegetable oil for deep frying — neutral oils like canola, sunflower, or refined avocado oil are good choices; you need enough for about 2–3 inches of oil in a heavy pot.
- 1/2 cup mayonnaise — plain, or use an olive oil or avocado oil-based mayo if you prefer.
- 2 tablespoons ketchup — for sweetness and tang.
- 1 teaspoon gluten-free Worcestershire sauce — check the label (or see substitution below).
- 1 teaspoon prepared horseradish (optional) — for a peppery lift.
- 1/2 teaspoon smoked paprika — for depth in the sauce.
- 1/4 teaspoon garlic powder — extra garlicky note in the sauce.
- Salt and black pepper to taste — for finishing the sauce.
Optional Add-ons
Simple extras that add comfort or flavor
- Fresh chopped parsley or chives — a sprinkle brightens the finished bites.
- Lemon wedges — a quick squeeze adds a bright counterpoint to fried goodness.
- Grated Parmesan or a dairy-free alternative — toss lightly with the hot onion bites for an extra savory touch (use gluten-free cheese).
- A pinch of sugar in the dredge — if your onions are very sweet, a little sugar can help caramel-like flavor develop when fried.
- Pickled jalapeños or a quick dill pickle relish on the side — tangy contrasts are lovely.
Substitutions and Shortcuts
Home-cook friendly swaps that keep things easy
- Gluten-free flour: If you don’t have a 1:1 GF blend, use a mix of 3/4 cup rice flour + 1/4 cup tapioca starch (approx.) to get a light dredge. Either way, keep it labeled gluten-free.
- Gluten-free panko: If you can’t find GF panko, pulse plain GF crackers, cornflakes, or gluten-free bread in a food processor until coarse — aim for flaky crumbs, not fine powder.
- Worcestershire sauce: If you’re unsure about brand ingredients, substitute 1 teaspoon tamari (gluten-free soy sauce) plus 1/2 teaspoon apple cider vinegar and a light dash of molasses or maple syrup to mimic the sweet-tangy character.
- Buttermilk: No buttermilk? Make a quick mix: 1 cup milk (or dairy-free milk) + 1 tablespoon lemon juice or white vinegar; let sit 5–10 minutes until slightly thickened.
- Oil for frying: If you prefer to bake rather than fry, you can shallow-bake or air-fry these bites — see the How-To section for notes.
How to Make Bite-Sized Blooming Onions Step-by-Step
I like to think of this as a cozy, relaxed process; you’re not racing a timer like a chef on TV. I’ll walk you through gentle steps that keep the result tender inside and satisfyingly crisp outside.
Prepare the onions
- Peel the onions and trim the ends so they sit flat. Cut each onion into bite-sized petals or wedges: start by halving the onion from top to root, then slice each half into 6–8 wedges depending on size. You’re aiming for little “petals” that hold together at the base but separate easily when cooked.
- Pat the pieces dry with a paper towel. A little surface moisture is fine, but drier surfaces help the coating adhere.
Set up your dredging station
- In Bowl 1: whisk together 1 cup gluten-free all-purpose flour, 1 teaspoon paprika, 1/2 teaspoon garlic powder, 1/2 teaspoon onion powder, 1/2 teaspoon cayenne pepper, and 1/2 teaspoon salt. This seasoned flour gives the first flavorful layer.
- In Bowl 2: pour 1 cup buttermilk. If you like, whisk a splash of hot sauce or a pinch of salt into the buttermilk for extra seasoning.
- In Bowl 3: place 2 cups gluten-free panko breadcrumbs in a shallow dish. If you want an extra-crispy crust, add a tablespoon or two of the seasoned flour to the panko and mix.
Coat the onion pieces, gently
- One by one, dredge each onion petal in the seasoned flour, tapping off any excess. Then dip it into the buttermilk, letting a little drip back into the bowl, and finally press it into the panko so the breadcrumbs adhere evenly. Make sure every piece is fully coated, but don’t over-handle — the less pressing you do, the airier the crust will be.
- Place coated pieces on a baking sheet or plate in a single layer as you work. If you need to pause, keep them chilled briefly to prevent sogginess.
Heat the oil carefully
- Pour enough vegetable oil into a heavy pot or deep fryer so it reaches about 2–3 inches high. Heat to 350°F (175°C). If you don’t have a thermometer, test with a small piece of breadcrumb; it should sizzle and float steadily without charring immediately.
- I like using a deep pot because a narrow fryer keeps the oil temperature more stable.
Fry in batches
- Fry the coated onion petals in batches. Don’t crowd the pot — too many pieces at once drops the oil temperature and leads to greasy, chewy results.
- Cook each batch about 2 to 3 minutes, turning once if needed, until golden brown and crisp. The interior should be tender and the exterior a warm golden color.
- Use a slotted spoon or spider to transfer the fried pieces to a rack set over a baking sheet or a layer of paper towels. Season immediately with a light sprinkle of salt while still hot.
Make the dipping sauce
- While the batches are frying, mix the sauce: 1/2 cup mayonnaise, 2 tablespoons ketchup, 1 teaspoon gluten-free Worcestershire sauce (or tamari + apple cider vinegar substitute), 1 teaspoon prepared horseradish (optional), 1/2 teaspoon smoked paprika, 1/4 teaspoon garlic powder, and salt and pepper to taste. Stir until smooth and chill for 10–15 minutes if you have time — this lets the flavors settle.
- Taste and adjust seasoning; a touch more acid (a squeeze of lemon) brightens it nicely.
Serve and enjoy
- Arrange your Bite-Sized Blooming Onions on a platter with the dipping sauce in a small bowl in the center. Sprinkle with chopped parsley or chives for color if you like.
- These are best fresh and warm — the contrast between hot, crispy outside and sweet, tender onion inside is what makes them comforting.
Baked or air-fried option (shortcut)
- Preheat oven to 425°F (220°C) or set your air fryer to 400°F (200°C).
- Spray the coated onion pieces lightly with oil (use an oil mister or brush). Arrange in a single layer and bake 12–18 minutes, flipping once, until golden and crisp. For air fryer: cook 8–12 minutes, checking for doneness. Results are slightly less deep-fried but still delightful and lower oil.
A few calming reminders: you don’t need perfect scissors-like cuts; the wedges can be rustic. And if a few coatings flake off in the oil, that’s normal — skim them out and keep going. This recipe is meant to be enjoyed, not stressed over.
Common Mistakes to Avoid
Mistakes are part of learning in the kitchen; I make them all the time. The nice thing about this recipe is that most errors have simple fixes, and the result is forgiving. Here are three common missteps I see, and how to avoid them.
Mistake 1: Overcooking or Dry Texture
If the onion pieces come out dry or leathery, it’s usually from frying too long or at too high a temperature. Aim for 350°F (175°C) and watch the color rather than the clock. Golden brown is your cue. If you’re testing pieces, remove one and let it cool for a moment — the onion should still be tender inside.
Mistake 2: Over-mixing or Under-Seasoning
Under-seasoned coatings can make even great texture feel flat. Be generous with the seasoned flour and taste the sauce. Conversely, overworking the onion pieces while coating can press out moisture and make crumbs dense. Use light hands when pressing panko onto the buttermilk layer.
Mistake 3: Substitution Slip-Ups
Not all substitutes behave the same. For example, regular panko or bread crumbs will add gluten; gluten-free panko tends to be lighter. If you substitute crackers, pulse them to flakes rather than powder to keep crunch. And when swapping Worcestershire, adjust acidity and sweetness so the dip still has balance.
Serving Suggestions for Bite-Sized Blooming Onions
These bite-sized blooms are made for casual meals and sharing. They’re also great for easing into gluten-free comfort cooking, because they pair easily with familiar sides.
I like to serve them as a warm appetizer or as part of a laid-back family dinner — nothing fancy, just good food that invites conversation.
Cozy Side Pairings
- Rustic roasted potato wedges or classic fries (baked or air-fried) seasoned with a little garlic and rosemary feel right at home with these onion bites.
- A crisp green salad with a lemony vinaigrette balances the richness of the fried onions and keeps the meal feeling bright.
- Creamy coleslaw — a light, tangy slaw with cabbage and carrots adds crunch and coolness next to the warm bites.
Everyday Family Meals
- Make them part of a “build-your-own” sandwich or burger night: use gluten-free buns, lettuce, and tomato, and let everyone tuck a few onion bites into their sandwich for extra crunch.
- Serve alongside a simple roasted chicken or sheet-pan dinner for a comforting weekend meal that feels a little special.
- Turn them into a snack board with sliced veggies, pickles, and the dipping sauce for an easy family movie night.
Casual, Stress-Free Serving Ideas
- Plate them on a large platter with small bowls of sauce so friends and family can graze—no fuss, just passing plates and friendly conversation.
- Keep it simple: a few paper towels, a small bowl of sauce, and a timer to remind you when the next batch is ready. This keeps the kitchen calm and the host relaxed.
- For a lighter twist, offer lemon wedges and a herbed yogurt dip as alternatives to the mayo-based sauce.

Conclusion
I want you to walk away feeling confident: gluten-free cooking can be comforting, simple, and reliably delicious. Bite-Sized Blooming Onions fit naturally into home life — they’re forgiving to make, flexible with substitutions, and satisfyingly snackable for family or friends. If you’d like to compare notes with another trusted recipe or see a slightly different take, I sometimes peek at other versions online for inspiration, like this Bite-Sized Blooming Onions ~ Crunch Time Kitchen. I hope you make these again and again — and share a plate with someone you love.
FAQs About Bite-Sized Blooming Onions
Yes — when you use a gluten-free all-purpose flour blend and certified gluten-free panko or crumbs, the recipe is gluten-free. I always recommend checking labels on packaged items (like Worcestershire and panko) to confirm they’re labeled gluten-free if you’re cooking for someone with celiac disease or a high sensitivity.
Absolutely. I suggest practicing with one small batch to get your oil temperature right. Use a thermometer if you have one, or test with a single breadcrumb to see if it sizzles gently. Fry in small batches and keep an eye on the color; golden brown is the best visual cue.
Transfer fried pieces to a rack over a baking sheet so air circulates and they don’t steam on paper towels. Keep finished batches warm in a low oven (200°F/95°C) on a rack until you’re ready to serve, and season with a little salt just after frying for the best texture.
If you can’t find gluten-free panko, pulse gluten-free crackers or cornflakes to a coarse breadcrumb in a food processor. You can also use crushed gluten-free tortilla chips for a different, crunchy flavor. Aim for coarser crumbs to mimic that airy panko texture.
The sauce is flexible. If you’re serving kids, leave out the horseradish and reduce the Worcestershire or tamari slightly; the ketchup and mayo base is usually very kid-friendly. Offer lemon wedges or a plain yogurt-based dip as an alternate for milder tastes.

Bite-Sized Blooming Onions
Ingredients
Method
- Peel the onions and trim the ends so they sit flat. Cut each onion into bite-sized petals or wedges.
- Pat the pieces dry with a paper towel to help the coating adhere.
- In Bowl 1: Whisk together flour, paprika, garlic powder, onion powder, cayenne pepper, and salt.
- In Bowl 2: Pour buttermilk, whisk in hot sauce or extra salt if desired.
- In Bowl 3: Place gluten-free panko breadcrumbs in a shallow dish, mix in some seasoned flour for extra crispiness if desired.
- Dredge each onion petal in seasoned flour, dip in buttermilk, then coat in panko breadcrumbs.
- Place coated pieces on a baking sheet in a single layer.
- Heat vegetable oil to 350°F (175°C) in a heavy pot to a depth of 2-3 inches.
- Fry onion petals in batches for 2-3 minutes until golden brown and crisp, turning if needed.
- Transfer fried pieces to a rack and sprinkle with salt while hot.
- Mix mayonnaise, ketchup, Worcestershire sauce, horseradish, smoked paprika, garlic powder, and season with salt and pepper to taste.
- Chill for 10-15 minutes before serving.
- Arrange Bite-Sized Blooming Onions on a platter with the dipping sauce in a bowl.
- Sprinkle with parsley or chives and serve warm.