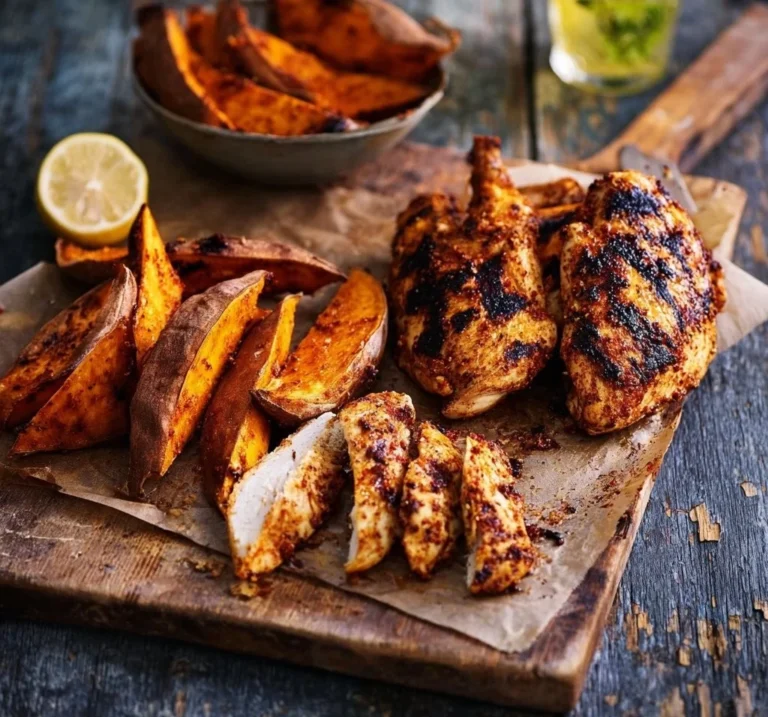
Hawaiian Chicken Sheet Pan
I still remember the first time I made this Hawaiian Chicken Sheet Pan on a rainy Tuesday — the kitchen smelled like sweet pineapple and garlic, and for a little while everything felt easier. If you ever worry about timing, seasoning, or whether gluten-free dinners can be simple and tasty, I get it — I do too. This recipe is forgiving, cozy, and perfect for weeknights, and if you enjoy easy sheet-pan dinners you might also like my maple dijon chicken sheet pan for another simple, gluten-free option.
A Quick Look at This Hawaiian Chicken Sheet Pan Recipe
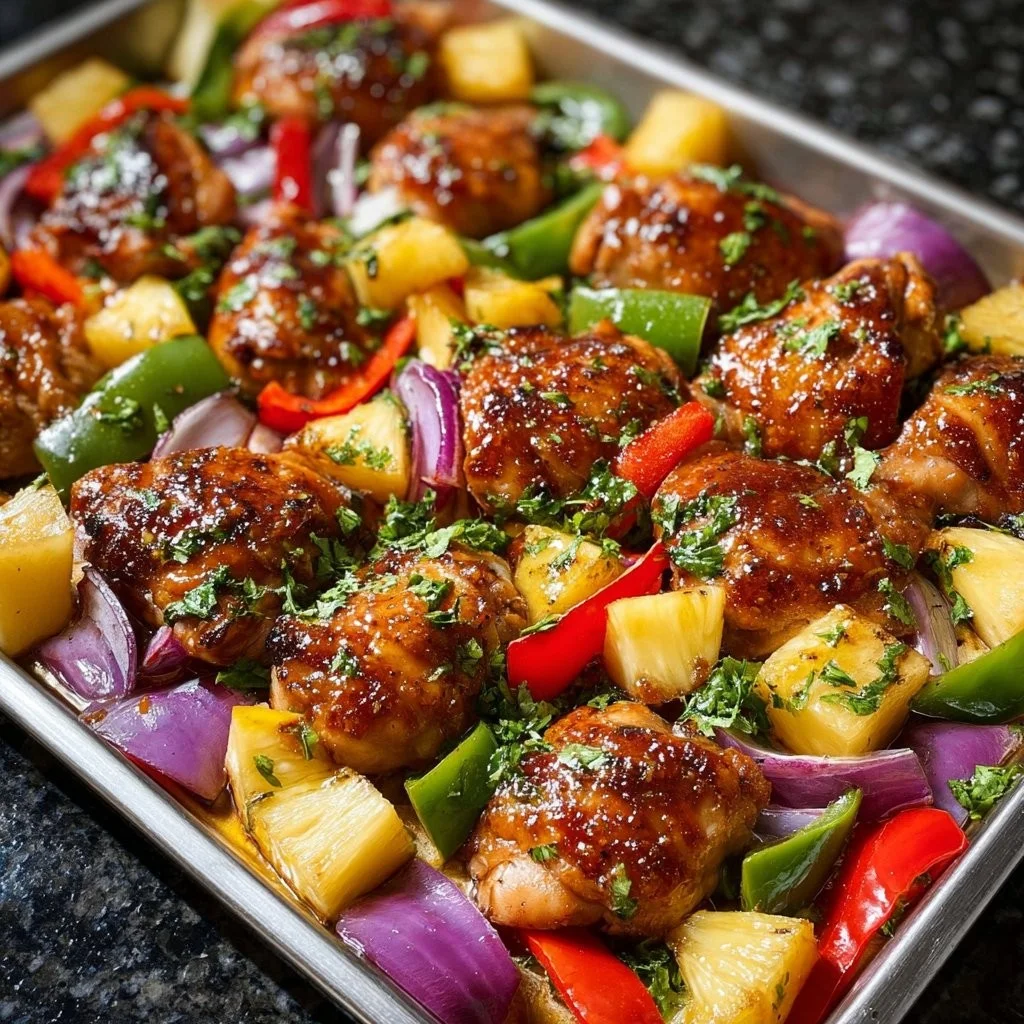
This Hawaiian Chicken Sheet Pan brings together juicy chicken, bell pepper, red onion, and sweet pineapple for a one-pan comfort meal. The familiar flavors — tangy pineapple and a gluten-free tamari-based sauce — make it feel both bright and homey. It’s simple to prep, gentle on timing, and gives reliably tender chicken and caramelized vegetables. Perfect for busy nights or when you want something that feels special without fuss — keep reading and I’ll walk you through it step by step.
Ingredients You’ll Need for Hawaiian Chicken Sheet Pan
Below I expand the simple ingredient list into what you’ll actually buy and keep in your kitchen. Everything here is gluten-free and chosen to make the recipe approachable and comforting.
Essentials
Trusted gluten-free essentials
- 2 lbs boneless, skinless chicken breasts, cut into bite-sized pieces — choose evenly sized pieces so they cook at the same rate. If you prefer dark meat, see substitutions below.
- 1 bell pepper, sliced (any color) — I like red or orange for sweetness and color.
- 1 medium red onion, sliced into wedges or half-moons — it softens and gets slightly sweet when roasted.
- 2 cups pineapple chunks (fresh or canned in juice) — fresh is lovely, but drained canned pineapple works great too.
- 2 tablespoons gluten-free tamari or gluten-free soy sauce — traditional soy sauce usually contains wheat, so use tamari or a certified gluten-free soy alternative.
- 2 tablespoons olive oil — helps everything roast and gives a gentle richness.
- 1 teaspoon minced garlic — fresh or jarred is fine.
- Salt and pepper to taste — start light and adjust after baking if needed.
- Cooked rice for serving — plain white, jasmine, or brown rice; see substitutions for cauliflower rice.
- Chopped green onions for garnish — they add color and fresh flavor.
- Sesame seeds for garnish (optional) — make sure they’re from a trusted source and labeled gluten-free if you’re very sensitive.
Optional Add-ons
(Simple extras that add comfort or flavor)
- 1–2 teaspoons honey or brown sugar — for a touch more caramelized sweetness if you like it sticky.
- A splash (1 teaspoon) of rice vinegar or lime juice — brightens the flavors before serving.
- Red pepper flakes or a small dash of chili paste — for a gentle heat.
- Sliced snap peas or snow peas — added about halfway through if you want extra green crunch.
- Toasted macadamia nuts or chopped cashews — sprinkle on at the end for a Hawaiian-inspired crunch.
Substitutions and Shortcuts
(Home-cook friendly swaps that keep things easy)
- Chicken thighs instead of breasts: If you prefer juicier meat, boneless skinless chicken thighs work beautifully and are forgiving if slightly overcooked.
- Coconut aminos instead of tamari: For a soy-free option that’s naturally gluten-free, coconut aminos are milder and slightly sweeter.
- Frozen pineapple: Thaw and drain before tossing on the sheet pan to avoid excess moisture.
- Pre-cut veggies: Use pre-sliced bell pepper and onion from the grocery store to save 5–10 minutes.
- Cooked rice shortcut: Use microwaveable rice pouches for quicker weeknight dinners, or serve over leftover rice.
- One-pan clean-up: Line the baking sheet with parchment paper or use a silicone mat for easy clean-up and to keep flavors true.
How to Make Hawaiian Chicken Sheet Pan Step-by-Step
I like to keep this process calm and straightforward so you can enjoy the rhythm of cooking without worrying. Here are gentle, beginner-friendly steps that build confidence and let you relax into the dinner flow.
Preheat and prepare your workspace
- Preheat your oven to 400°F (200°C). While it warms, clear a space on the counter and line a large baking sheet with parchment paper for easier clean-up. Having everything within reach makes the process feel smoother.
Cut and arrange the main ingredients
- Cut the chicken into even, bite-sized pieces so they cook evenly. Slice the bell pepper and red onion into similar-sized pieces so everything finishes at roughly the same time. If your pineapple is fresh, cut it into chunks about the same size as the chicken.
Toss the chicken and produce together
- In a large mixing bowl, gently combine the chicken pieces, sliced bell pepper, red onion, and pineapple chunks. Tossing them together first helps the sauce coat everything evenly later.
Make the simple gluten-free sauce
- In a smaller bowl, whisk together 2 tablespoons gluten-free tamari (or coconut aminos), 2 tablespoons olive oil, and 1 teaspoon minced garlic. Add a pinch of salt and pepper — keep seasoning light now because the sauce concentrates while roasting.
Coat everything with the sauce
- Pour the sauce over the chicken and vegetables, then use a spatula or clean hands to toss until everything is nicely coated. Don’t worry about perfection — a light, even coating is all you need.
Arrange in a single layer on the sheet pan
- Spread the mixture out on the prepared baking sheet in a single layer with a little space between pieces. Crowding can cause steaming instead of roasting. If your pan is small, split it across two pans or roast in two batches.
Bake until cooked through and tender
- Place the sheet pan in the preheated oven and bake for 20–25 minutes. The chicken is done when pieces are opaque throughout and the juices run clear; a quick tip is that chicken will feel firm but still springy. If you use a thermometer, aim for 165°F (74°C). Vegetables should be tender with slightly caramelized edges.
Finish and serve
- Remove from the oven and let the pan sit for a few minutes. Taste and add a pinch more salt or a squeeze of lime if you like a little brightness. Sprinkle chopped green onions and sesame seeds over the top. Serve over a bed of warm rice (or cauliflower rice) and enjoy the cozy, homey meal.
A few gentle reminders: it’s okay if some pieces brown more than others, and if the pineapple releases a bit of juice, that’s part of the charm — it creates a glaze as everything roasts. Perfection isn’t the point; a warm, satisfying dinner is.
Common Mistakes to Avoid
Mistakes are part of learning in my kitchen — I’ve made them all — and they rarely ruin dinner. Here are three common hiccups and how I handle them so you can feel confident.
Mistake 1: Dry chicken
Why it happens: Overcooking or uneven piece sizes can dry out breast meat.
How to avoid it: Cut chicken into even bite-sized pieces, check for doneness around 20 minutes, and remove it once opaque and firm but still slightly springy. Using thighs is a forgiving option if you’re worried about dryness.
Mistake 2: Over-mixing or under-seasoning
Why it happens: Tossing too vigorously can bruise delicate veggies; being too timid with salt leaves flavors flat.
How to avoid it: Gently toss to coat ingredients, and season in layers — a little salt in the sauce and a final taste test after cooking. If you prefer bold flavors, add a drizzle of honey or a splash of rice vinegar before serving.
Mistake 3: Ingredient substitutions that change texture
Why it happens: Some swaps add too much moisture or cook at different rates (e.g., frozen pineapple straight from the bag).
How to avoid it: Thaw and drain frozen pineapple first, choose veggies that cook similarly (avoid thick-root veggies unless par-cooked), and remember coconut aminos are sweeter — reduce any added sweetener if using them.
Serving Suggestions for Hawaiian Chicken Sheet Pan
I love serving this dish in ways that feel relaxed and family-friendly. It’s comforting, colorful, and pairs with simple sides that keep dinner easy and satisfying.
Classic Rice and Veg
Serve the Hawaiian Chicken Sheet Pan over steamed jasmine or brown rice with a side of quick-steamed broccoli or green beans. The rice soaks up the pineapple juices and the veggies add a fresh bite.
Light and Fresh Sides
For a lighter meal, pair the chicken with cauliflower rice and a crisp cucumber salad dressed in rice vinegar and sesame oil. The contrast of warm roasted pieces and cool salad keeps things bright and balanced.
Comfort-Packed Add-ons
If you’re feeding hungry people, add a bowl of mashed sweet potatoes or roasted baby potatoes on the side. Toasted sesame seeds and chopped macadamia nuts feel indulgent but still homey.

Conclusion
I make this Hawaiian Chicken Sheet Pan when I want a dinner that’s both comforting and easy to trust — the flavors are familiar, the steps are forgiving, and cleanup is simple. If you’d like a slightly different take on sheet-pan chicken nights, I also find inspiration from other home cooks; one lovely variation is available at Sheet Pan Hawaiian Chicken | The Girl Who Ate Everything. I hope you’ll make this recipe soon, and that it becomes one of those dinners you reach for on busy nights — warm, flexible, and reliably tasty.
FAQs About Hawaiian Chicken Sheet Pan
Yes. For the Hawaiian Chicken Sheet Pan you can use coconut aminos or a certified gluten-free soy sauce if you don’t have tamari. Coconut aminos are slightly sweeter and milder, so taste before serving and adjust a little less sweetener if you’re adding honey.
Absolutely. The Hawaiian Chicken Sheet Pan keeps well in the fridge for 3–4 days in an airtight container. Store rice separately and reheat gently in a skillet or oven so the chicken stays tender. I recommend adding garnishes like green onions and sesame seeds just before serving.
To keep chicken moist in the Hawaiian Chicken Sheet Pan, cut pieces evenly, avoid overcooking, and consider using boneless skinless thighs if you’re worried about dryness. A short rest after baking helps redistribute juices. A light brush of the pan juices before serving adds extra moisture.
Yes — for a vegetarian Hawaiian Chicken Sheet Pan style dinner, swap cubed firm tofu or tempeh for chicken and use coconut aminos for flavor. Press and pat-dry tofu first so it browns instead of stewing, and bake until golden and slightly crisp.
If the Hawaiian Chicken Sheet Pan is too saucy, try draining canned pineapple well or roasting on a larger pan to allow juices to evaporate more. You can also finish the pan under a broiler for 1–2 minutes to caramelize excess liquid (watch closely so it doesn’t burn).
I’m glad you’re making gluten-free dinners at home — they can be comforting, adaptable, and simple. If you try this recipe, I’d love to hear how you made it your own.
Hawaiian Chicken Sheet Pan
Ingredients
Method
- Preheat the oven to 400°F (200°C) and line a large baking sheet with parchment paper.
- Cut the chicken into even, bite-sized pieces. Slice the bell pepper and red onion into similar-sized pieces. Cut fresh pineapple into similar-sized chunks.
- In a large mixing bowl, gently combine the chicken, sliced bell pepper, red onion, and pineapple.
- In a smaller bowl, whisk together tamari, olive oil, and minced garlic. Season lightly with salt and pepper.
- Pour the sauce over the chicken and vegetables and toss until coated.
- Spread the mixture on the prepared baking sheet in a single layer.
- Bake for 20-25 minutes or until chicken is opaque and juices run clear.
- Let the pan sit for a few minutes. Taste and adjust seasoning if needed.
- Garnish with chopped green onions and sesame seeds. Serve over warm rice.