Gluten Free Puff Pastry Recipe
I remember the late afternoons—after-school backpacks, spilled juice, and the clock glaring at me—when I just want dinner on the table fast. Gluten-free options can feel limited and fussy, but this Gluten Free Puff Pastry Recipe is a real family-saver: forgiving, quick once you get the hang of it, and loved by both kids and adults. I keep this version on repeat for busy nights because it gives flaky, buttery results without complicated techniques, and it’s flexible enough for picky eaters.
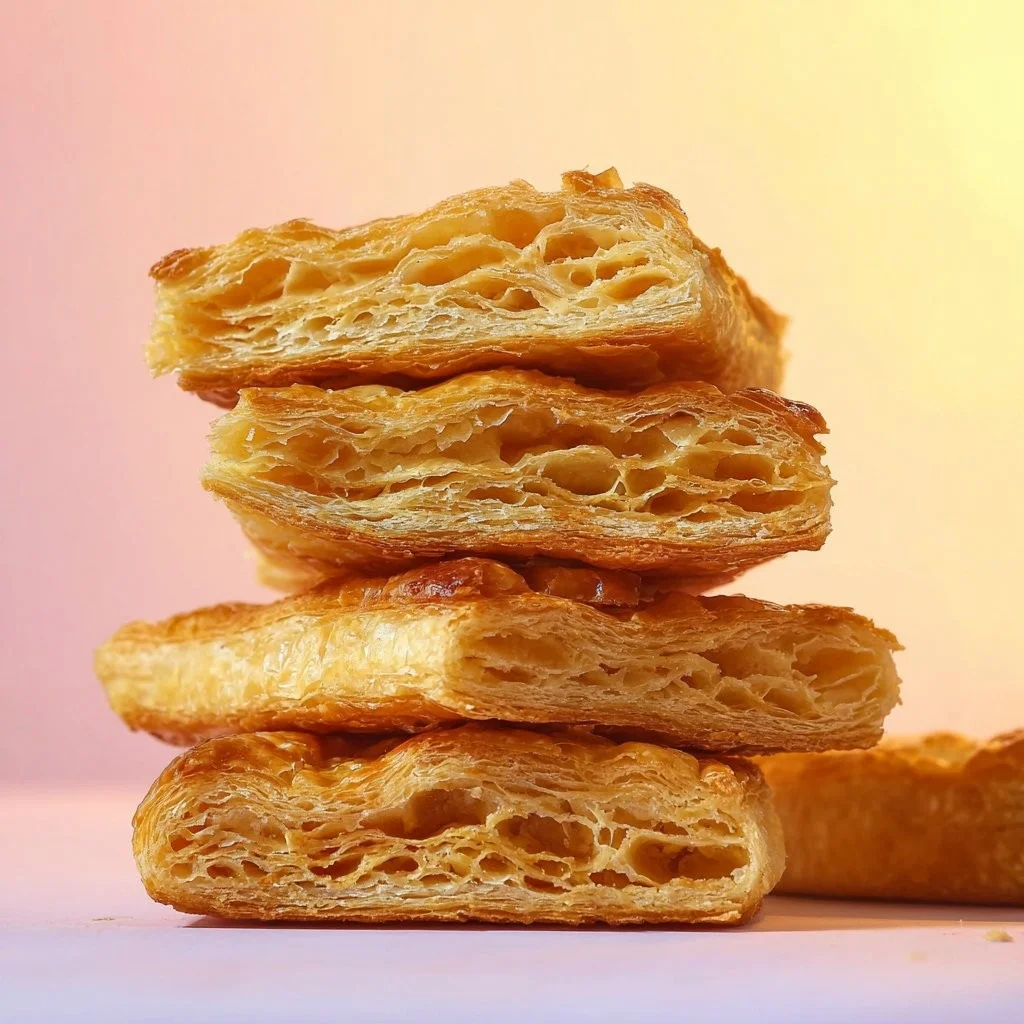
A Quick Look at This Gluten Free Puff Pastry Recipe Recipe
This gluten free puff pastry uses cold unsalted butter and a reliable plain gluten-free flour blend that kids and grown-ups enjoy for familiar buttery flavor and crisp layers. It’s make-ahead friendly — you can prepare the dough and freeze it, which saves evening stress. Minimal equipment and simple folds mean less cleanup and fewer chances to go wrong. Perfect for weeknight tarts, easy pizza pockets, or sweet turnovers, this recipe promises flaky results that hold up even if you’re short on time.
In case you want another quick gluten-free treat to pair with puff pastry snacks, I also link to my crisp, chewy gluten-free churros recipe for a simple dessert idea.
Ingredients You’ll Need for Gluten Free Puff Pastry Recipe
Below I list the essentials and a few kid-friendly extras. Everything here is easy to find in supermarkets or online and is 100% gluten-free.
Essentials
- 250 g unsalted butter (it MUST be cold!) — Use a good-quality block butter. Cold butter is key for flaky layers.
- 250 g plain gluten-free flour — I use FREEE or any trusted supermarket blend labeled gluten-free. Choose a blend with rice or tapioca for best texture.
- 1.5 tsp xanthan gum — Helps give structure and elasticity that wheat would normally provide.
- 1 tsp fine salt — Balances the flavor; kosher salt works fine if you adjust by eye.
- 150 ml ice cold water — Keeps butter firm and binds the dough.
Tools that make the job easier (not ingredients, but helpful): a bench scraper or spatula, a rolling pin, parchment paper, and a small dish of ice water nearby.
Optional Add-ons
- 1 tbsp granulated sugar — For lightly sweetening pastry used in fruit turnovers or cinnamon twists.
- Ground cinnamon or vanilla paste — A small sprinkle for sweeter bakes.
- Grated cheddar or mozzarella — For savory pockets or cheese sticks (all labeled gluten-free).
- Egg wash (1 beaten egg + splash water) — Gives a glossy finish for tarts and savory turnovers.
- Sesame seeds or poppy seeds — For topping savory sticks.
- Pre-cooked chicken, shredded cheese, or mild salsa — Quick fillings that kids usually accept.
All suggested add-ons should be labeled gluten-free and free of pork or alcohol.
Substitutions and Shortcuts
- Flour swap: If you don’t have FREEE, choose any 1:1 gluten-free plain blend that contains a combination of rice flour, potato starch, or tapioca starch. Avoid single-flour mixes (like only almond flour) for puff pastry.
- Xanthan gum: If your blend already has xanthan gum, reduce or omit the extra 1.5 tsp — check the blend label. If you don’t have xanthan, guar gum can work as a substitute.
- Butter alternative: I recommend real butter for classic flavor and layering. Some dairy-free block margarines churn similarly but check the package for water content and freezing performance.
- Time-saver: Make a rough puff version — you can cut the butter into uneven chunks and fold fewer times (see below). It’s not as tall as classic puff, but it’s faster and still flaky.
- Pre-made option: If you’re truly pressed for time, keep a batch in the freezer ready to roll; frozen dough thaws quickly on the counter for 20–30 minutes.
How to Make Gluten Free Puff Pastry Recipe Step-by-Step
Below I rewrite the classic “make the dough, laminate, chill and repeat” into clear, fast steps that keep cleanup and fuss to a minimum. I focus on efficiency without compromising the flaky result.
Prep and chill
- Cut 250 g cold unsalted butter into 1 cm cubes and return them to the fridge while you measure dry ingredients. Keep a bowl of ice water at hand.
- Line your work surface with a large piece of parchment to keep things tidy.
Make the base dough (rough pastry)
- In a large bowl, whisk together 250 g plain gluten-free flour, 1.5 tsp xanthan gum (unless your blend already contains it), and 1 tsp salt.
- Add the cold butter cubes and use a pastry cutter or two knives to chop them into the flour until the mixture looks like coarse crumbs with some pea-sized butter bits. It’s okay to have visible chunks — that’s what creates layers.
- Pour in 150 ml ice cold water gradually and gently fold until the dough comes together in a shaggy mass. Don’t overwork it; bits of butter should remain visible.
- Shape the dough into a rough rectangle, wrap in plastic or parchment, and chill in the fridge for 20–30 minutes. This firms the butter and reduces sticking.
Flatten and laminate (first roll)
- Lightly flour your parchment with gluten-free flour. Place the chilled dough on it and press into a rectangle about 20 x 15 cm.
- Use a rolling pin to roll the dough into a long rectangle roughly 40 x 20 cm. Keep short, confident rolls — avoid over-rolling.
- Imagine the rectangle like a book: fold the top third down over the center, then fold the bottom third up over that (a letter fold). That’s one “turn.”
- Rotate the dough 90 degrees, wrap in parchment or plastic, and chill for 20–30 minutes. Chilling relaxes the dough and keeps butter cold.
Repeat the rolling and folding (laminate)
- Do 3 more turns: roll to the same size, fold into thirds, rotate, and chill between each turn. For faster rough puff pastry, do 2 turns instead of 4 — still generous on flakiness but quicker.
- Keep your rolling surface lightly floured and work briskly so the butter doesn’t soften.
Final chill and shape
- After the final fold and chill, roll the dough out to your desired thickness (about 3–4 mm for tarts or 5–6 mm for turnovers).
- Cut and shape for your recipe: squares for turnovers, circles for tart bases, or strips for cheese straws.
- If making filled pastries, keep edges sealed with a little egg wash or water.
Bake from chilled or frozen
- For best lift, bake from chilled or lightly frozen. Preheat your oven to 200–220°C (390–430°F) for 10–15 minutes before baking.
- Brush with egg wash if using, sprinkle toppings if desired, and bake until puffed and golden — typically 12–20 minutes depending on size, maybe longer for larger tarts.
- Let cool briefly on a rack; flaky layers are delicate when hot.
Make-ahead & freezing
- To freeze: wrap the rolled dough tightly in parchment and foil. It keeps well for up to 2 months.
- To use from frozen, unwrap and place on a lined baking tray; bake straight from frozen, adding a few extra minutes to the bake time.
Time-saving notes:
- Use parchment to roll and fold — it keeps your counter clean and saves washing.
- If you’re short on time, do fewer folds (2–3 turns) for a rough puff pastry that still feels special.
- Make multiple batches and freeze; you’ll thank me on a hectic weeknight.
Common Mistakes to Avoid
Keep these simple tips in mind to avoid stress, extra cleanup, and pastry that doesn’t puff as expected.
Mistake 1: Using warm butter or overworking the dough
Warm butter will smear into the flour instead of staying in distinct layers. Work quickly, keep butter cold, and stop when the dough just comes together.
Mistake 2: Skipping the chill steps
Skipping chilling to save time usually costs you in results. Quick chill breaks (20–30 minutes) are essential for flaky layers and less stickiness — but you can shorten the number of turns if truly pressed.
Mistake 3: Overflouring or underbaking
Too much flour while rolling will dry the pastry and reduce lift; too little baking time leaves it soggy. Use just enough flour to prevent sticking and bake until deep golden for crisp layers.
Serving Suggestions for Gluten Free Puff Pastry Recipe
This pastry is versatile for dinner, snacks, and dessert. Here are quick, low-fuss serving ideas that kids will eat without debate.
I like to pair pastries with simple sides that require almost no hands-on time and keep flavors familiar for picky eaters.
Kid-friendly sides
- Quick carrot sticks or cucumber slices with hummus or a mild ranch dip.
- A simple green salad tossed with olive oil and lemon for adults; offer dressing on the side for kids.
- Applesauce or fresh fruit cubes for a sweet, fresh contrast.
Easy add-ons
- Cheese and ham substitute: shredded chicken or turkey with a slice of mild cheese makes a comforting pocket.
- Fruit filling: spoon canned or fresh fruit with a sprinkle of sugar and cinnamon into triangles for fast turnovers.
- Savory spread: pesto or sun-dried tomato paste spread thinly before filling adds instant flavor.
Minimal prep plating
- Serve straight from the tray alongside small bowls of dipping sauces (tomato, yogurt dip, or maple syrup).
- Create a “build-your-own” plate where kids pick a filling and add small toppings — quick and engaging for little hands.
- Reheat leftovers on a baking sheet (200°C / 400°F) for 5–8 minutes to refresh crispness.

Conclusion
I’ve shared this Gluten Free Puff Pastry Recipe because I want busy families to feel confident that flaky, buttery pastry is possible without fancy skills or long prep. It saves time with make-ahead options, freezes beautifully, and adapts to whatever fillings your kids and family love. If you’d like a slightly different technique or inspiration for sweet vs savory uses, I also find the Quick & Easy Gluten Free Puff Pastry – The Loopy Whisk helpful for a different perspective and extra tips. I hope you make this recipe again and that it becomes one of your go-to weeknight solutions.
FAQs About Gluten Free Puff Pastry Recipe
From start to finish including chill time, plan 2–3 hours if you do four turns with chilling between each. For a weeknight-friendly version, do a rough puff with 2 turns and short chills — you can be ready in about an hour. I usually make dough ahead and freeze it so I only need 10–20 minutes to roll and bake on busy nights.
Yes — use a plain gluten-free blend labeled for baking (I use FREEE or similar supermarket blends). If the mix includes xanthan gum, reduce or omit the extra xanthan listed. Trusted blends give consistent results; avoid single-ingredient flours like almond or coconut for puff pastry.
Absolutely. Keep fillings simple — cheese and cooked shredded chicken, apple-cinnamon, or even a bit of jam — and cut pastries into small, familiar shapes. The flaky texture often wins kids over, and making a “build-your-own” platter gets them involved and more likely to try it.
You can try a block dairy-free spread designed for baking, but results can vary because water content and melting behavior differ from butter. If you need dairy-free, choose a product that’s specifically recommended for puff pastry or do a test batch first. I recommend real butter for best flaky lift if dairy isn’t an issue.
Store cooled pastries in an airtight container for up to 2 days at room temperature; for longer storage, freeze them wrapped in foil or plastic for up to 2 months. Reheat in a hot oven to restore crispness rather than microwaving, which can make them soggy.
Gluten Free Puff Pastry
Ingredients
Method
- Cut 250 g cold unsalted butter into 1 cm cubes and return them to the fridge while you measure dry ingredients. Keep a bowl of ice water at hand.
- Line your work surface with a large piece of parchment to keep things tidy.
- In a large bowl, whisk together 250 g plain gluten-free flour, 1.5 tsp xanthan gum (unless your blend already contains it), and 1 tsp salt.
- Add the cold butter cubes and use a pastry cutter or two knives to chop them into the flour until the mixture looks like coarse crumbs with some pea-sized butter bits.
- Pour in 150 ml ice cold water gradually and gently fold until the dough comes together in a shaggy mass. Don’t overwork it; bits of butter should remain visible.
- Shape the dough into a rough rectangle, wrap in plastic or parchment, and chill in the fridge for 20–30 minutes.
- Lightly flour your parchment with gluten-free flour and place the chilled dough on it.
- Press into a rectangle about 20 x 15 cm and roll into a long rectangle roughly 40 x 20 cm.
- Fold the top third down over the center, then the bottom third up over that (a letter fold). That’s one ‘turn’.
- Rotate the dough 90 degrees, wrap in parchment or plastic, and chill for another 20–30 minutes.
- Do 3 more turns: roll, fold into thirds, rotate, and chill between each turn.
- After the final fold and chill, roll out to your desired thickness (about 3–4 mm for tarts or 5–6 mm for turnovers).
- Cut and shape the dough for your recipe: squares for turnovers, circles for tart bases, or strips for cheese straws.
- Seal edges with a little egg wash or water for filled pastries.
- Preheat your oven to 200–220°C (390–430°F) for 10–15 minutes before baking.
- Brush with egg wash if using, sprinkle toppings if desired, and bake until puffed and golden (typically 12–20 minutes).
- Let cool briefly on a rack.
- Wrap the rolled dough tightly in parchment and foil. It keeps well for up to 2 months.
- To use from frozen, unwrap and place on a lined baking tray; bake straight from frozen, adding a few extra minutes to the bake time.