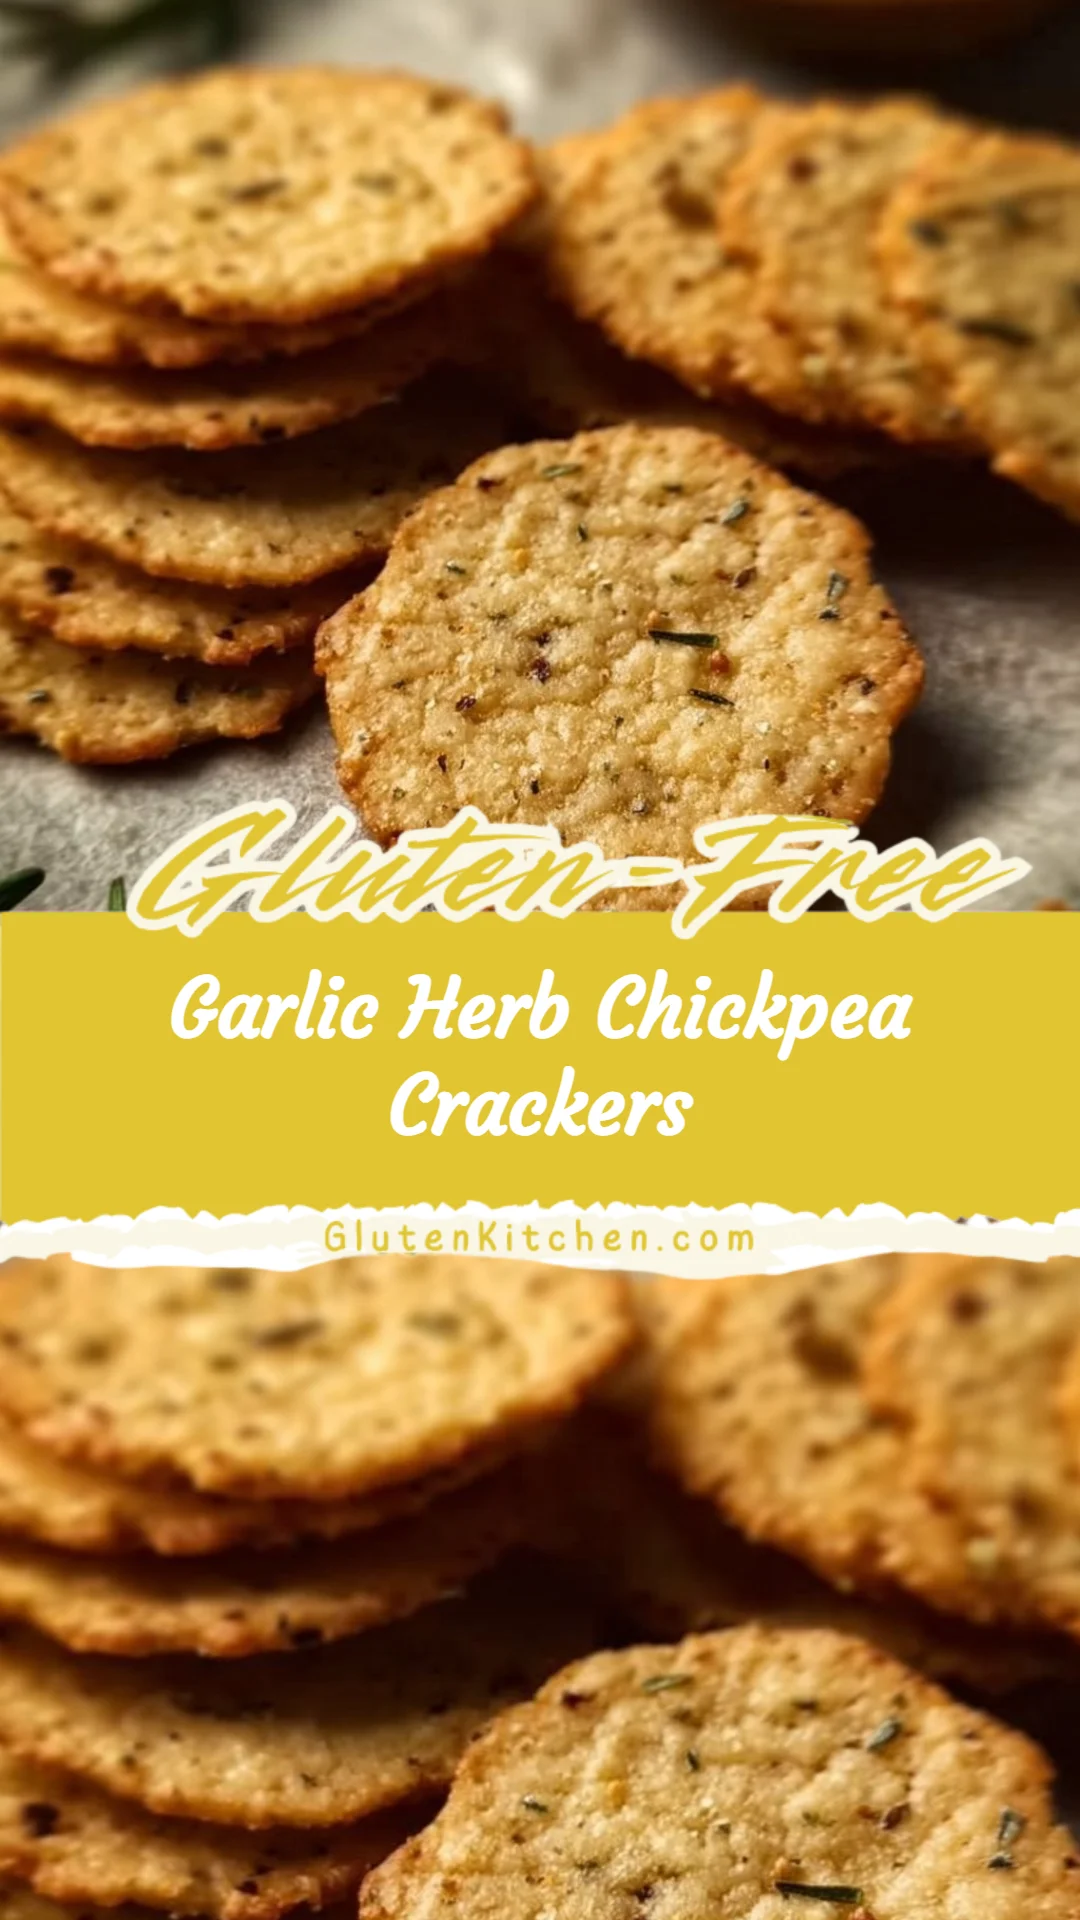
Garlic Herb Chickpea Crackers
I know how important it is to trust what’s on your plate when you’re managing gluten intolerance or celiac disease. You want snacks that are simple, nourishing, and safe — not full of hidden gluten or complicated techniques. These Garlic Herb Chickpea Crackers are naturally gluten-free, made from chickpea (besan) flour and pantry herbs, and I’ll walk you through how to make them safely and confidently at home.
A Quick Look at This Garlic Herb Chickpea Crackers Recipe
These Garlic Herb Chickpea Crackers are naturally high in plant protein and fiber thanks to chickpea flour, which helps keep blood sugar steadier and keeps you fuller longer than many refined-grain crackers. The recipe is inherently gluten-free when you use certified gluten-free chickpea flour and check all seasonings for gluten-free labeling. Olive oil adds heart-healthy fats and the dried herbs and garlic powder contribute savory flavor without extra sodium. This recipe is quick, family-friendly, and great for weeknight snack prep or packing for lunches when you need a safe gluten-free option.
Ingredients You’ll Need for Garlic Herb Chickpea Crackers
Below I expand the original ingredient list into practical groups so you can shop confidently. Whenever I mention an ingredient that can be cross-contaminated with gluten in manufacturing, I note that it should be certified gluten-free.
Essentials
- 120 g (about 1 cup) chickpea flour (besan) — use certified gluten-free chickpea flour to avoid cross-contact.
- 120 ml (about ½ cup) water, room temperature
- 2 tablespoons extra-virgin olive oil (plus extra for brushing)
- 1 teaspoon dried mixed herbs (a blend of rosemary, thyme, oregano) — check label and use a certified gluten-free herb blend if in doubt
- 1 teaspoon garlic powder — verify gluten-free labeling if using a bulk spice
- ½ teaspoon fine salt
- ¼ teaspoon freshly ground black pepper
- Parchment paper (for baking) — single-use or cleaned reusable liner dedicated to gluten-free use
Toppings (choose as desired):
- Sesame seeds (white or black) — buy from sealed, labeled packages and check gluten-free wording if your store has bulk bins
- Flaky sea salt (for finishing)
- Additional dried herbs for sprinkling
Optional Add-ons
- Grated Parmesan or other hard cheese (for non-vegan option) — ensure the cheese is free from anti-caking agents containing gluten
- Crushed red pepper flakes for heat
- Everything bagel seasoning (check label — many blends are gluten-free, but verify)
- Ground cumin or smoked paprika for a different flavor profile
- 1–2 teaspoons nutritional yeast for a savory, cheesy note (use labeled gluten-free if necessary)
Substitutions and Gluten-Free Adjustments
- Chickpea flour: Do not substitute with wheat-based flours. If chickpea flour is unavailable, a blend of certified gluten-free flours may work but will change texture. I recommend sticking with chickpea flour for best results and nutrition.
- Olive oil: You can use avocado oil or mild-tasting vegetable oil if preferred.
- Water: For a richer cracker, replace up to 30 ml of water with milk or a dairy-free milk (check label for gluten-free status).
- Herbs and spices: Swap the dried mixed herbs with 1 teaspoon each of rosemary and thyme, or ½ teaspoon each of oregano and basil — always verify packaged spices are gluten-free.
Note: Ingredients that should be certified gluten-free where noted: chickpea flour, spice blends, sesame seeds (if purchased from bulk bins), and any packaged seasoning mixes.
Ingredient alternatives for allergies or availability
- Legume allergy or chickpea intolerance: If you must avoid chickpeas, this specific recipe isn’t suitable. You’ll need an alternative base like certified gluten-free rice flour or a pre-made gluten-free cracker mix, but expect a different texture and flavor.
- Sesame allergy: Omit sesame seeds and use poppy seeds or a sprinkle of extra herbs instead.
- Dairy-free: Skip any cheese add-ons and use nutritional yeast for umami.
- Nut-free: Recipe is naturally nut-free — keep all tools and surfaces free of nut contamination.
- Gluten cross-contact risk: Avoid bulk bins unless they’re clearly labeled gluten-free and there’s no risk of shared scoops. Buy sealed, labeled packages to reduce cross-contact.
Always read labels and, when in doubt, choose certified gluten-free products to reduce the risk of cross-contamination.
How to Make Garlic Herb Chickpea Crackers Step-by-Step
I’ve rewritten the original instructions into a simple, beginner-friendly method. I also emphasize where to be careful about gluten-free safety and cross-contamination.
Prepare and preheat
- Preheat the oven to 350°F (175°C). Position an oven rack in the middle. This gives even heat for uniform crisping.
- Line a baking sheet with parchment paper, letting it extend a little over the edges so you can lift the crackers off easily. Use clean, dedicated parchment or a liner you reserve for gluten-free baking.
Mix dry ingredients (gluten-free safety tip)
- In a medium mixing bowl, whisk together 120 g chickpea flour (certified gluten-free), 1 teaspoon dried mixed herbs, 1 teaspoon garlic powder, ½ teaspoon salt, and ¼ teaspoon black pepper.
- Break up any clumps by whisking well or sifting. If you use a sieve, make sure it’s clean and hasn’t been used for wheat flours.
Form the dough
- Create a well in the dry ingredients. Pour in 2 tablespoons olive oil and half of the water (about 60 ml). Stir with a wooden spoon or silicone spatula.
- Gradually add the remaining 60 ml water while stirring until a smooth, cohesive dough forms with no dry pockets.
- Texture check: Aim for a play-dough consistency — firm but pliable. If the dough is too dry, add water a teaspoon at a time. If it’s too wet, add a small sprinkle of chickpea flour.
Knead lightly
- Turn the dough onto a clean surface lightly dusted with chickpea flour. Knead gently for about 30 seconds just to bring it together. The dough should be slightly tacky but not sticky enough to cling to your fingers.
- Cross-contamination note: Use surfaces and tools that are scrubbed and free from gluten residue. If you share a kitchen, consider a cutting board or work surface reserved for gluten-free cooking.
Roll out and score
- Place the dough between two sheets of parchment paper. Using a rolling pin, roll it out to about 1/8 inch (3 mm) thickness, keeping it even so crackers bake uniformly.
- Carefully peel off the top parchment sheet. Using a pizza cutter, sharp knife, or pastry wheel, score the dough into your desired cracker shapes — squares, rectangles, or diamonds. Scoring rather than cutting makes it easier to break into pieces after baking.
Add toppings
- If you like, lightly brush the surface with a bit of water or olive oil and sprinkle sesame seeds, flaky sea salt, or extra dried herbs. Press toppings gently so they stick.
- Use a clean brush designated for gluten-free use or one you’ve just washed to avoid cross-contact.
Bake
- Transfer the parchment with scored dough to the prepared baking sheet. Bake for 15–20 minutes, checking at around 12 minutes. You’re looking for golden-brown edges and a firm surface when gently pressed.
- Oven tip: If you find the crackers are browning too fast on the edges, lower the temperature by 10–15°F and extend baking time a few minutes.
Crisp and cool
- Remove the baking sheet from the oven and allow the crackers to cool completely on the sheet. They will firm up as they cool.
- For extra crispness, after the initial bake is done, turn off the oven, crack the door open, and leave the crackers inside for an additional 10–15 minutes. This gentle residual heat dries them further without burning.
Break and store
- Once fully cooled, break along the score lines. Store the crackers in an airtight container at room temperature for up to one week. If you live in a humid climate, add a small food-safe desiccant (or a folded paper towel) to keep them crisp.
- Storage tip: Keep the container away from gluten-containing foods to avoid cross-contact.
Common Mistakes to Avoid
Keeping snacks safe and tasty is all about small details. I encourage careful labeling, clean work habits, and modest adjustments to keep texture and flavor on track.
Mistake 1: Using non-certified or bulk spices without checking labels
If your chickpea flour and spices are not clearly labeled gluten-free, you risk cross-contact. I always buy sealed packages or products marked “certified gluten-free” especially for flours and spice blends. Avoid shared scoops in bulk bins, and keep separate utensils for gluten-free prep.
Mistake 2: Rolling too thin or too thick
Texture problems often come from uneven thickness. Rolling the dough too thin will make crackers brittle and prone to burning; too thick and they won’t crisp. Aim for about 1/8 inch (3 mm) and roll evenly between parchment sheets. If you want uniform thickness, use rolling pin rings or spacers.
Mistake 3: Overbaking or underbaking
Chickpea-based crackers can go from good to dry quickly. Check at the 12-minute mark and look for golden edges and a firm center. They’ll crisp as they cool — don’t judge doneness solely by texture straight from the oven. If you underbake, they’ll be chewy; overbake and they’ll taste dry and get too brown.
Serving Suggestions for Garlic Herb Chickpea Crackers
These crackers work well as part of balanced meals and snacks. I like to pair them with protein, vegetables, and healthy fats for satisfying, gluten-free bites.
- Pair with dips like hummus, tzatziki (use gluten-free yogurt), or a white bean dip for a protein- and fiber-rich snack.
- Use as a crunchy side to soups or salads for texture — they’re especially nice with tomato-based soups or roasted vegetable salads.
- Build simple lunch boxes: crackers, sliced cucumber and bell pepper, a hard-boiled egg or a small container of cheese, and fresh fruit for a balanced, portable meal.
Balanced snack plates
Make a small platter with Garlic Herb Chickpea Crackers, a scoop of olive oil–based tapenade, carrot sticks, and a handful of olives. It’s balanced and easy to assemble.
As part of a light meal
Serve a few crackers alongside a mixed greens salad topped with grilled chicken or chickpeas and a lemon-olive oil dressing for a quick lunch.
Kid-friendly pairings
Pack crackers with mild cheese sticks, apple slices, and a small portion of nut-free seed butter for a school-safe snack (check school policies and labels).
Conclusion
I make these Garlic Herb Chickpea Crackers regularly because they’re reliable, gluten-free, and adaptable — perfect for anyone who needs safe snacks without sacrificing flavor. If you’d like a different texture or want to explore similar chickpea-based cracker recipes for inspiration, I also find it helpful to compare methods like the ones in this article: Chickpea Crackers (4 Ingredients, High-Protein) – The Conscious Plant Kitchen. Try the recipe, adjust herbs and toppings to your taste, and store baked crackers in an airtight container to keep them crisp. I hope these crackers make your gluten-free snacking a little easier and more enjoyable — happy baking!
FAQs About Garlic Herb Chickpea Crackers
Yes, Garlic Herb Chickpea Crackers can be safe for people with celiac disease if you use certified gluten-free chickpea flour and ensure all spices and toppings are labeled gluten-free. I always recommend cleaning surfaces and utensils well or using equipment reserved for gluten-free cooking to avoid cross-contact.
You can prepare the dough ahead and freeze it for up to 1 month, wrapped tightly. Thaw in the refrigerator and roll as directed before baking. Once baked, crackers don’t freeze as well — they can lose crispness. For best quality, bake fresh after thawing the dough or store baked crackers at room temperature in an airtight container for up to one week.
If you’re allergic to sesame, simply omit the sesame seeds. You can replace them with poppy seeds, extra dried herbs, or a light sprinkle of flaky sea salt. Always check labels on seed or spice packages to make sure they’re certified gluten-free.
To keep Garlic Herb Chickpea Crackers crisp, roll them evenly to 1/8 inch thickness and allow them to cool fully on the baking sheet. Storing them in a sealed, airtight container at room temperature keeps moisture out. If you live somewhere humid, add a clean paper towel inside the container to absorb excess moisture.
Absolutely. The dough scales well; multiply ingredients proportionally and bake on multiple sheets. Make sure not to crowd the oven — bake sheets one at a time or rotate them if your oven heat is uneven. Store in airtight containers and label them with the date. For longer storage, consider making smaller batches frequently to maintain freshness.

Garlic Herb Chickpea Crackers
Ingredients
Method
- Preheat the oven to 350°F (175°C) and position an oven rack in the middle.
- Line a baking sheet with parchment paper.
- In a medium mixing bowl, whisk together chickpea flour, dried mixed herbs, garlic powder, salt, and black pepper.
- Create a well in the dry ingredients, pour in olive oil and half of the water.
- Stir and gradually add remaining water until a smooth dough forms.
- Turn the dough onto a clean surface lightly dusted with chickpea flour and knead gently for about 30 seconds.
- Place the dough between two sheets of parchment paper and roll it out to about 1/8 inch thickness.
- Score the dough into desired cracker shapes.
- Lightly brush surface with water or olive oil and sprinkle desired toppings.
- Transfer the parchment with scored dough to the prepared baking sheet and bake for 15-20 minutes.
- Remove from the oven and allow to cool completely on the sheet.
- Once cooled, break along the score lines and store in an airtight container.