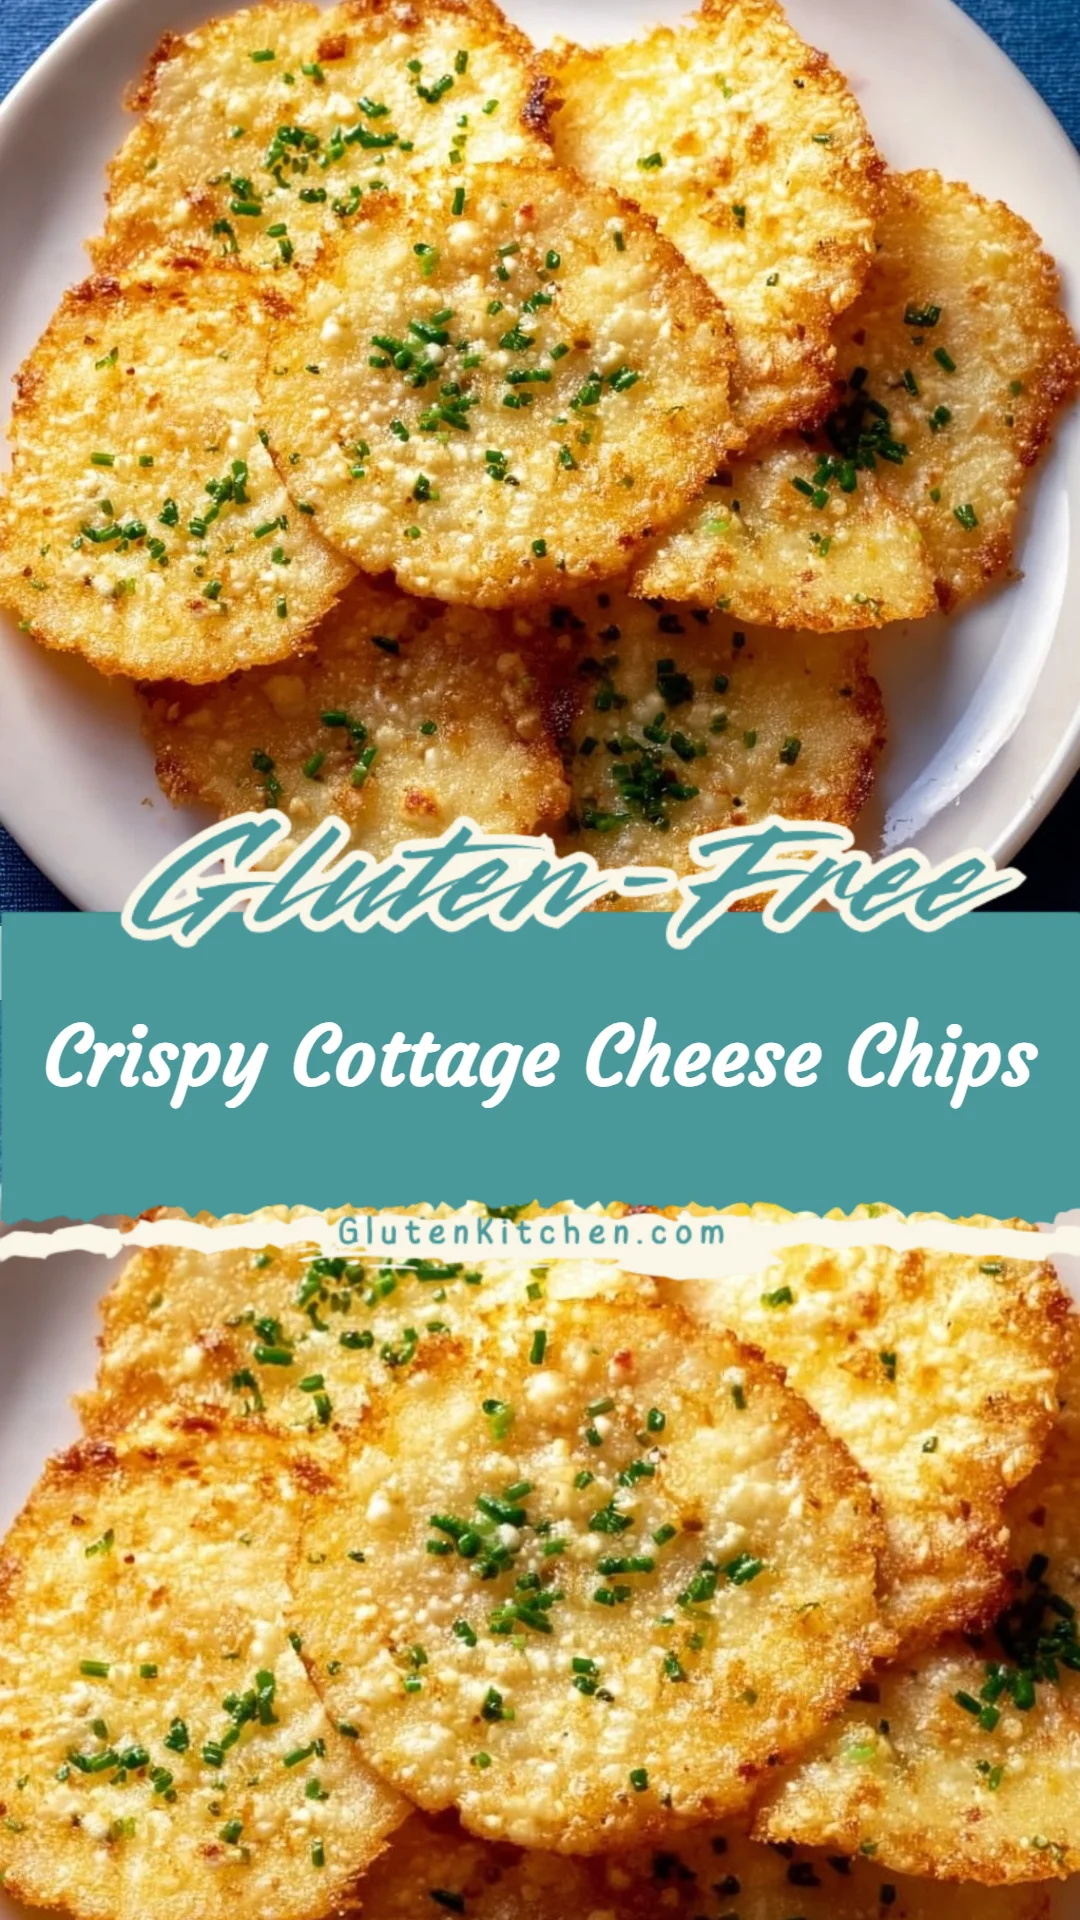
Crispy Cottage Cheese Chips
Living gluten-free often means balancing comfort, flavor, and safety. I get how frustrating it is to stare at labels, worry about hidden gluten, or miss crunchy snacks that don’t upset your digestive comfort. This Crispy Cottage Cheese Chips recipe is simple, nourishing, and easy to make at home — and when you follow the label and cross-contamination tips I share, it’s a safe gluten-free treat you can feel confident about serving to family and friends.
A Quick Look at This Crispy Cottage Cheese Chips Recipe
Crispy Cottage Cheese Chips are a high-protein, low-carb snack or side that uses cottage cheese as the main ingredient for both flavor and nutrition. Cottage cheese provides a good source of protein and calcium, while the seasonings (garlic and onion powder, smoked paprika) add depth without extra carbs. This recipe is naturally gluten-free when you use plain cottage cheese and single-ingredient spices or spices labeled certified gluten-free. It’s quick enough for weeknight cooking, works well for meal prep, and gives families a crunchy, savory alternative to grain-based chips.
Ingredients You’ll Need for Crispy Cottage Cheese Chips
Below I organize the ingredients into essentials and optional add-ons, and I include substitutions and adjustments that keep the recipe 100% gluten-free.
Essentials
- 2 cups (16 oz) cottage cheese, full-fat or low-fat, small curd preferred — choose plain cottage cheese and check the label for any starches or flavorings. Most plain cottage cheese is naturally gluten-free, but some brands add stabilizers; pick a brand labeled gluten-free when possible.
- 1/2 teaspoon garlic powder — single-ingredient garlic powder is usually gluten-free, but buy a certified gluten-free brand if you’re concerned about cross-contact.
- 1/2 teaspoon onion powder — same guidance as garlic powder; check the label or choose certified gluten-free.
- 1/4 teaspoon smoked paprika (optional) — adds smoky depth; use a single-ingredient paprika with no anti-caking blends that may contain gluten.
- 1/4 teaspoon freshly ground black pepper
- 1/4 teaspoon salt
- 1 tablespoon finely chopped chives — fresh herbs are naturally gluten-free.
- 1 tablespoon grated Parmesan cheese — real Parmesan is typically gluten-free, but some pre-grated cheeses include anti-caking agents; look for a certified gluten-free label or a whole wedge you grate yourself.
Optional Add-ons
- 1/4 teaspoon dried oregano or Italian seasoning (ensure blends are certified gluten-free)
- 1–2 tablespoons grated sharp cheddar or pecorino (check label)
- A pinch of cayenne for heat
- Sesame seeds or chia seeds for extra texture (ensure seeds are from a facility with gluten-free practices if cross-contact is a concern)
- Finely chopped fresh parsley or dill for bright herb flavor
Substitutions and Gluten-Free Adjustments
- Cottage cheese swap: If you are intolerant to lactose or avoid dairy, try a well-drained, firm Greek yogurt (full-fat strained yogurt) or a lactose-free cottage cheese labeled gluten-free. Note: texture and baking time may vary.
- Cheese swap: Use freshly grated cheeses rather than pre-grated to avoid anti-caking agents; always choose brands that state “gluten-free” when you need strict assurance.
- Spice blends: If using any spice blends (like Italian seasoning), buy certified gluten-free, or make your own mix from single-ingredient dried herbs.
- Equipment: Use clean, dedicated utensils and a clean baking sheet free of crumbs from gluten-containing foods to minimize cross-contact.
Ingredient alternatives for allergies or availability
- Dairy-free option: For a dairy-free alternative, I recommend trying a thick, well-drained, unsweetened plain plant-based yogurt (coconut, almond, or soy) that’s been strained to remove excess liquid. Texture will differ; bake a test batch to adjust time and thickness. Ensure the product is gluten-free certified.
- Nut allergies: Avoid almond-based yogurt if you have a nut allergy; choose coconut or oat (certified gluten-free oat) alternatives instead.
- Parmesan allergy/avoidance: Substitute with nutritional yeast for a cheesy flavor, making sure the nutritional yeast is labeled gluten-free.
- Spices and flavorings: If garlic or onion powder cause issues, use minced fresh garlic or shallot (in small amounts) and pat chips dry well; fresh ingredients are naturally gluten-free.
- Hidden gluten sources: Avoid flavored cottage cheese varieties (e.g., fruit-on-bottom or savory blends) because they sometimes include thickeners or flavor packs with gluten-containing ingredients. Also avoid spice blends, bouillon powders, or pre-mixed grated cheeses that don’t list gluten-free status.
Notes on avoiding hidden gluten sources:
- Always read the full ingredient list. Words like “malt,” “hydrolyzed wheat protein,” “modified food starch,” or “maltodextrin” (sometimes from wheat) are red flags. Maltodextrin is usually from corn in the U.S., but sourcing varies by country — look for a gluten-free label.
- Choose single-ingredient spices over blends when possible.
- If you’re cooking for someone with celiac disease, use products labeled “certified gluten-free” or from trusted brands with strong gluten-free practices.
How to Make Crispy Cottage Cheese Chips Step-by-Step
I’ll walk you through a beginner-friendly method with practical gluten-free safety tips and easy techniques for consistent results.
Preheat and prep:
- Preheat your oven to 350°F (175°C). Line a large baking sheet with a clean sheet of parchment paper or a silicone baking mat.
- Use a baking sheet and tools that are free from crumbs or residue from gluten-containing foods. If you share a kitchen, I recommend washing the baking sheet and utensils thoroughly before use.
Drain the cottage cheese:
- Place the 2 cups (16 oz) cottage cheese in a fine-mesh sieve set over a bowl. Press gently with the back of a spoon or a spatula to remove excess liquid. This step is important because drier cottage cheese crisps better.
- After pressing, transfer the cottage cheese to a plate and pat it dry with clean paper towels. The drier the mixture, the crisper the chips will be.
Mix the flavors:
- In a mixing bowl, combine the drained cottage cheese with 1/2 teaspoon garlic powder, 1/2 teaspoon onion powder, 1/4 teaspoon smoked paprika (optional), 1/4 teaspoon freshly ground black pepper, and 1/4 teaspoon salt. Mix gently until the seasonings are evenly distributed.
- If you’re using fresh herbs (chives, parsley) or a grated cheese add-in, fold them in now.
Portion and shape:
- Using a teaspoon or tablespoon, spoon tablespoon-sized portions onto the lined baking sheet. Space them about 2 inches apart to allow airflow and even crisping.
- Gently flatten each mound with the back of a spoon or the bottom of a small measuring cup into circles about 2 to 2.5 inches across. Aim for an even thickness to help them bake uniformly.
Add toppings:
- Sprinkle the tops with 1 tablespoon finely chopped chives and 1 tablespoon grated Parmesan cheese, or your chosen optional add-ons. If you prefer a dairy-free or vegan version, use nutritional yeast or a small sprinkle of sesame/chia seeds instead.
Bake for crispiness:
- Bake for 30 to 35 minutes, rotating the pan halfway through if your oven has hot spots. You’re looking for golden-brown edges and a surface that looks dry and set.
- Ovens vary, so check at 25 minutes onward and add time as needed.
Cool completely:
- Remove the baking sheet from the oven and let the chips cool completely on the sheet. Cooling is crucial — the chips firm up and reach maximum crispness as they cool.
- If you rush this step, they may break or be softer than intended.
Serve or store:
- Carefully peel the chips off the parchment paper and serve right away for peak crunch.
- To store: cool completely, then transfer to an airtight container with a paper towel to absorb any residual moisture. Keep at room temperature for up to 2 days. Re-crisp briefly in a 300°F (150°C) oven for 5–8 minutes if they soften.
Gluten-free safety notes in the steps:
- Keep all bowls, spoons, and the sieve clean and free of gluten crumbs. If you share kitchen space, wash equipment in hot soapy water before starting.
- Use parchment paper or a silicone mat rather than directly on a shared baking sheet to reduce cross-contact risk.
- If you use spices from a shared container, transfer what you need to a small bowl rather than dipping into the original container — this lowers the risk of cross-contact.
Common Mistakes to Avoid
Maintaining gluten-free safety while getting the texture right means watching for a few common slip-ups. Below I cover three specific mistakes I see often and how to avoid them.
Mistake 1: Using ingredients without checking for hidden gluten
Choosing a cottage cheese or spice blend without checking labels can introduce unexpected gluten. I always inspect ingredient lists and prefer products labeled “gluten-free.” Watch for additive names like “modified food starch,” “maltodextrin,” or “natural flavors” that don’t list a source. When in doubt, choose single-ingredient products or certified gluten-free brands.
Mistake 2: Not draining the cottage cheese enough
If the cottage cheese is too wet, chips will spread and stay soft instead of becoming crisp. Press the cottage cheese in a fine-mesh sieve, then pat it dry. The difference between a soggy cluster and a crisp chip often comes down to thorough draining and even thickness when you shape the rounds.
Mistake 3: Rushing the cooling or baking step
Under-baking produces limp chips; over-baking can burn the edges. Follow the 30–35 minute guideline, start checking at 25 minutes, and make sure to let the chips cool completely on the sheet before removing them. Cooling is when they firm up — skipping it is a common texture mistake.
Serving Suggestions for Crispy Cottage Cheese Chips
These chips are versatile. I love serving them as part of a balanced plate with protein and veggies, or as a crunchy snack. Below are three easy, everyday pairing ideas that are gluten-free and practical.
Savory snack plate
Pair Crispy Cottage Cheese Chips with sliced cucumbers, cherry tomatoes, and a small bowl of hummus (choose a gluten-free brand or homemade hummus). Add a few olives and a wedge of lemon for variety. This creates a balanced, shareable snack that’s great for afternoon cravings.
Light lunch bowl
Top a bed of mixed greens with roasted vegetables, a hard-boiled egg, and a handful of Crispy Cottage Cheese Chips for crunch. Drizzle with a simple olive oil and lemon dressing. The chips add protein and texture without relying on bread or crackers.
Family-friendly appetizer
Serve Crispy Cottage Cheese Chips with a small dipping trio: plain Greek yogurt mixed with herbs, a tomato salsa (no added thickeners), and a mashed avocado dip. They’re great for parties because they’re easy to make ahead and hold up well at room temperature for short periods.
Conclusion
I hope you feel encouraged to try these Crispy Cottage Cheese Chips as a crunchy, protein-rich gluten-free option that’s simple to make and easy to adapt for allergies and preferences. I like how flexible the recipe is — you can change the herbs, swap cheeses, or make a dairy-free version while keeping safety front of mind. For another take on cottage cheese chips and extra tips, you can check this helpful recipe for inspiration: Cottage Cheese Chips – The Big Man’s World ®
FAQs About Crispy Cottage Cheese Chips
Yes, Crispy Cottage Cheese Chips can be safe for people with celiac disease if you use plain cottage cheese and spices that are labeled gluten-free, and you follow cross-contact precautions (clean surfaces, dedicated utensils). I recommend certified gluten-free products when you need strict assurance.
You can experiment with strained, thick plant-based yogurts (coconut, soy, or almond) that are unsweetened and labeled gluten-free. Expect a different texture and baking time, so I suggest testing a small batch and adjusting draining and bake time to get a crisp result.
Store completely cooled Crispy Cottage Cheese Chips in an airtight container at room temperature with a paper towel to absorb moisture. I find they keep well for up to 2 days. If they soften, re-crisp in a 300°F (150°C) oven for 5–8 minutes.
Absolutely. Stick to single-ingredient spices and fresh herbs, or certified gluten-free spice blends. Add-ins like grated cheddar, nutritional yeast, or sesame seeds (from a gluten-free facility) all work well. Always check labels to avoid hidden gluten in pre-mixed seasonings.
Many store-bought cottage cheese brands are naturally gluten-free, but some include additives or stabilizers that could be a concern. I recommend checking the ingredient list and choosing a brand labeled “gluten-free” or one you trust for consistent gluten-free practices. If cooking for someone with celiac disease, opt for certified gluten-free products to minimize risk.
If you’d like, I can format this recipe into a printable card, suggest a grocery list that’s gluten-free friendly, or help you convert the recipe for air-fryer baking.

Crispy Cottage Cheese Chips
Ingredients
Method
- Preheat your oven to 350°F (175°C). Line a large baking sheet with a clean sheet of parchment paper or a silicone baking mat.
- Use a baking sheet and tools that are free from crumbs or residue from gluten-containing foods.
- Place the 2 cups of cottage cheese in a fine-mesh sieve over a bowl. Press gently to remove excess liquid.
- Transfer the cottage cheese to a plate and pat it dry with clean paper towels.
- In a mixing bowl, combine the drained cottage cheese with garlic powder, onion powder, smoked paprika, black pepper, and salt. Mix until the seasonings are evenly distributed.
- If using fresh herbs or a grated cheese add-in, fold them in now.
- Using a teaspoon or tablespoon, spoon tablespoon-sized portions onto the lined baking sheet. Space them 2 inches apart.
- Gently flatten each mound into circles about 2 to 2.5 inches across.
- Sprinkle the tops with chopped chives and grated Parmesan cheese or your chosen optional add-ons.
- Bake for 30 to 35 minutes, rotating the pan halfway through.
- Check at 25 minutes and add time as needed.
- Remove the baking sheet from the oven and let the chips cool completely on the sheet.
- Peel the chips off the parchment paper and serve immediately.
- To store, transfer to an airtight container with a paper towel to absorb moisture. Keep at room temperature for up to 2 days.